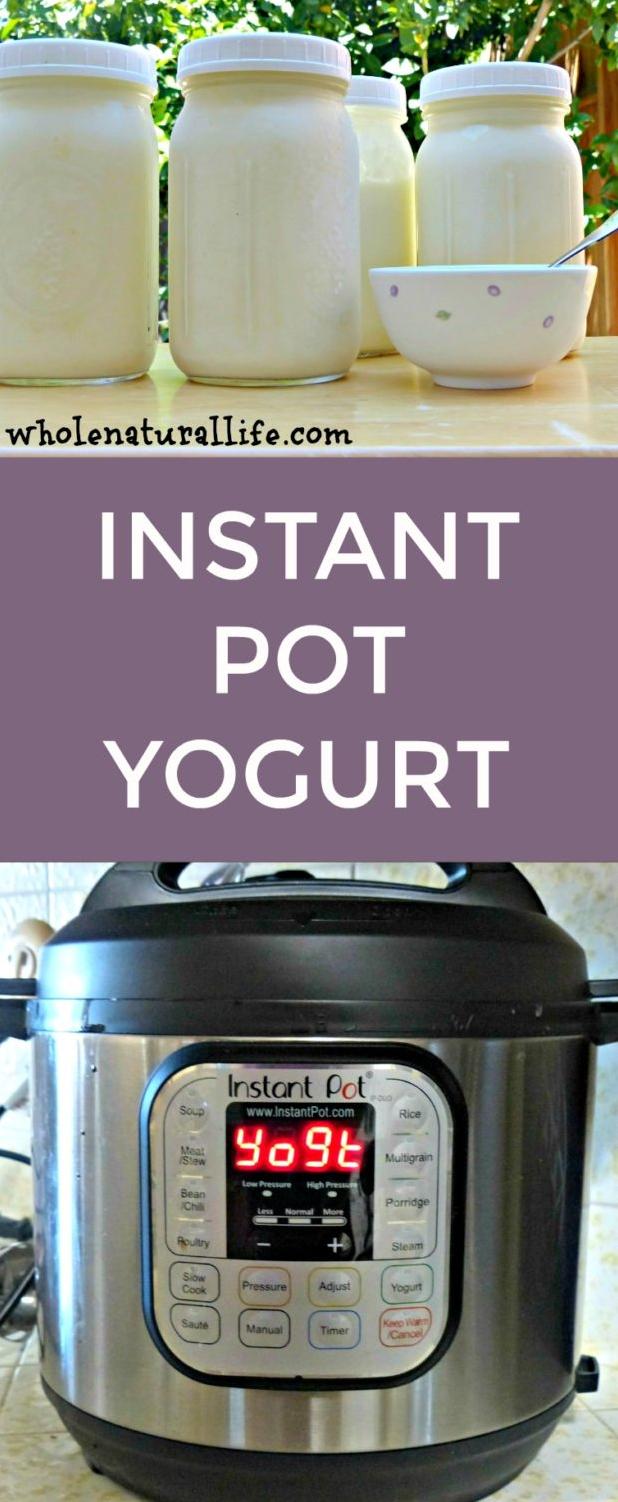
Mouth-watering Instant Pot Yogurt recipe, try it today!
If you’re a lover of yogurt, then you know that nothing compares to the creamy, tangy flavor of homemade yogurt. Fortunately, making your own yogurt has never been easier thanks to the Instant Pot. With the Instant Pot, you can create delicious and nutritious yogurt in no time – no special equipment or ingredients required!
As someone who has been making yogurt for years, I can confidently say that the Instant Pot yogurt method is one of the easiest and most foolproof ways to make your own homemade yogurt. Not only is it effortless, but it also yields consistently great results every time.
In this article, I’m going to share my go-to recipe for making Instant Pot yogurt. Whether you’re a beginner or an experienced cook, this recipe is sure to become a staple in your kitchen. So let’s get started and learn how to make the creamiest and most delicious Instant Pot Yogurt ever!
Why You’ll Love This Recipe

Do you love yogurt and wish to make it at home? Or maybe you’re just looking for a healthier snack option? Either way, this Instant Pot Yogurt Recipe is the perfect solution for you!
Why will you love it, you ask? Well, first of all, it’s incredibly simple and easy to make. With just a few ingredients and an Instant Pot, you’ll have delicious homemade yogurt in no time. Plus, it’s a great alternative to store-bought yogurt that often contains added sugars and preservatives.
But the best part about this recipe is its versatility. You can customize it to your liking by using different types of milk (such as lactose-free or Fairlife milk), adding flavorings like honey or vanilla extract, or even turning it into Greek yogurt by straining out the excess whey.
And let’s not forget about the cost savings. Making your own yogurt is significantly cheaper than buying it at the store, especially if you’re a big fan of Greek yogurt which tends to be more expensive.
So whether you’re looking for a healthier snack option, want to save some money, or just love the taste of homemade yogurt, this Instant Pot Yogurt Recipe is sure to become a staple in your kitchen.
Ingredient List
Before we get started with the recipe, let’s take a quick look at the ingredients you’ll need to make this delicious Instant Pot Yogurt.
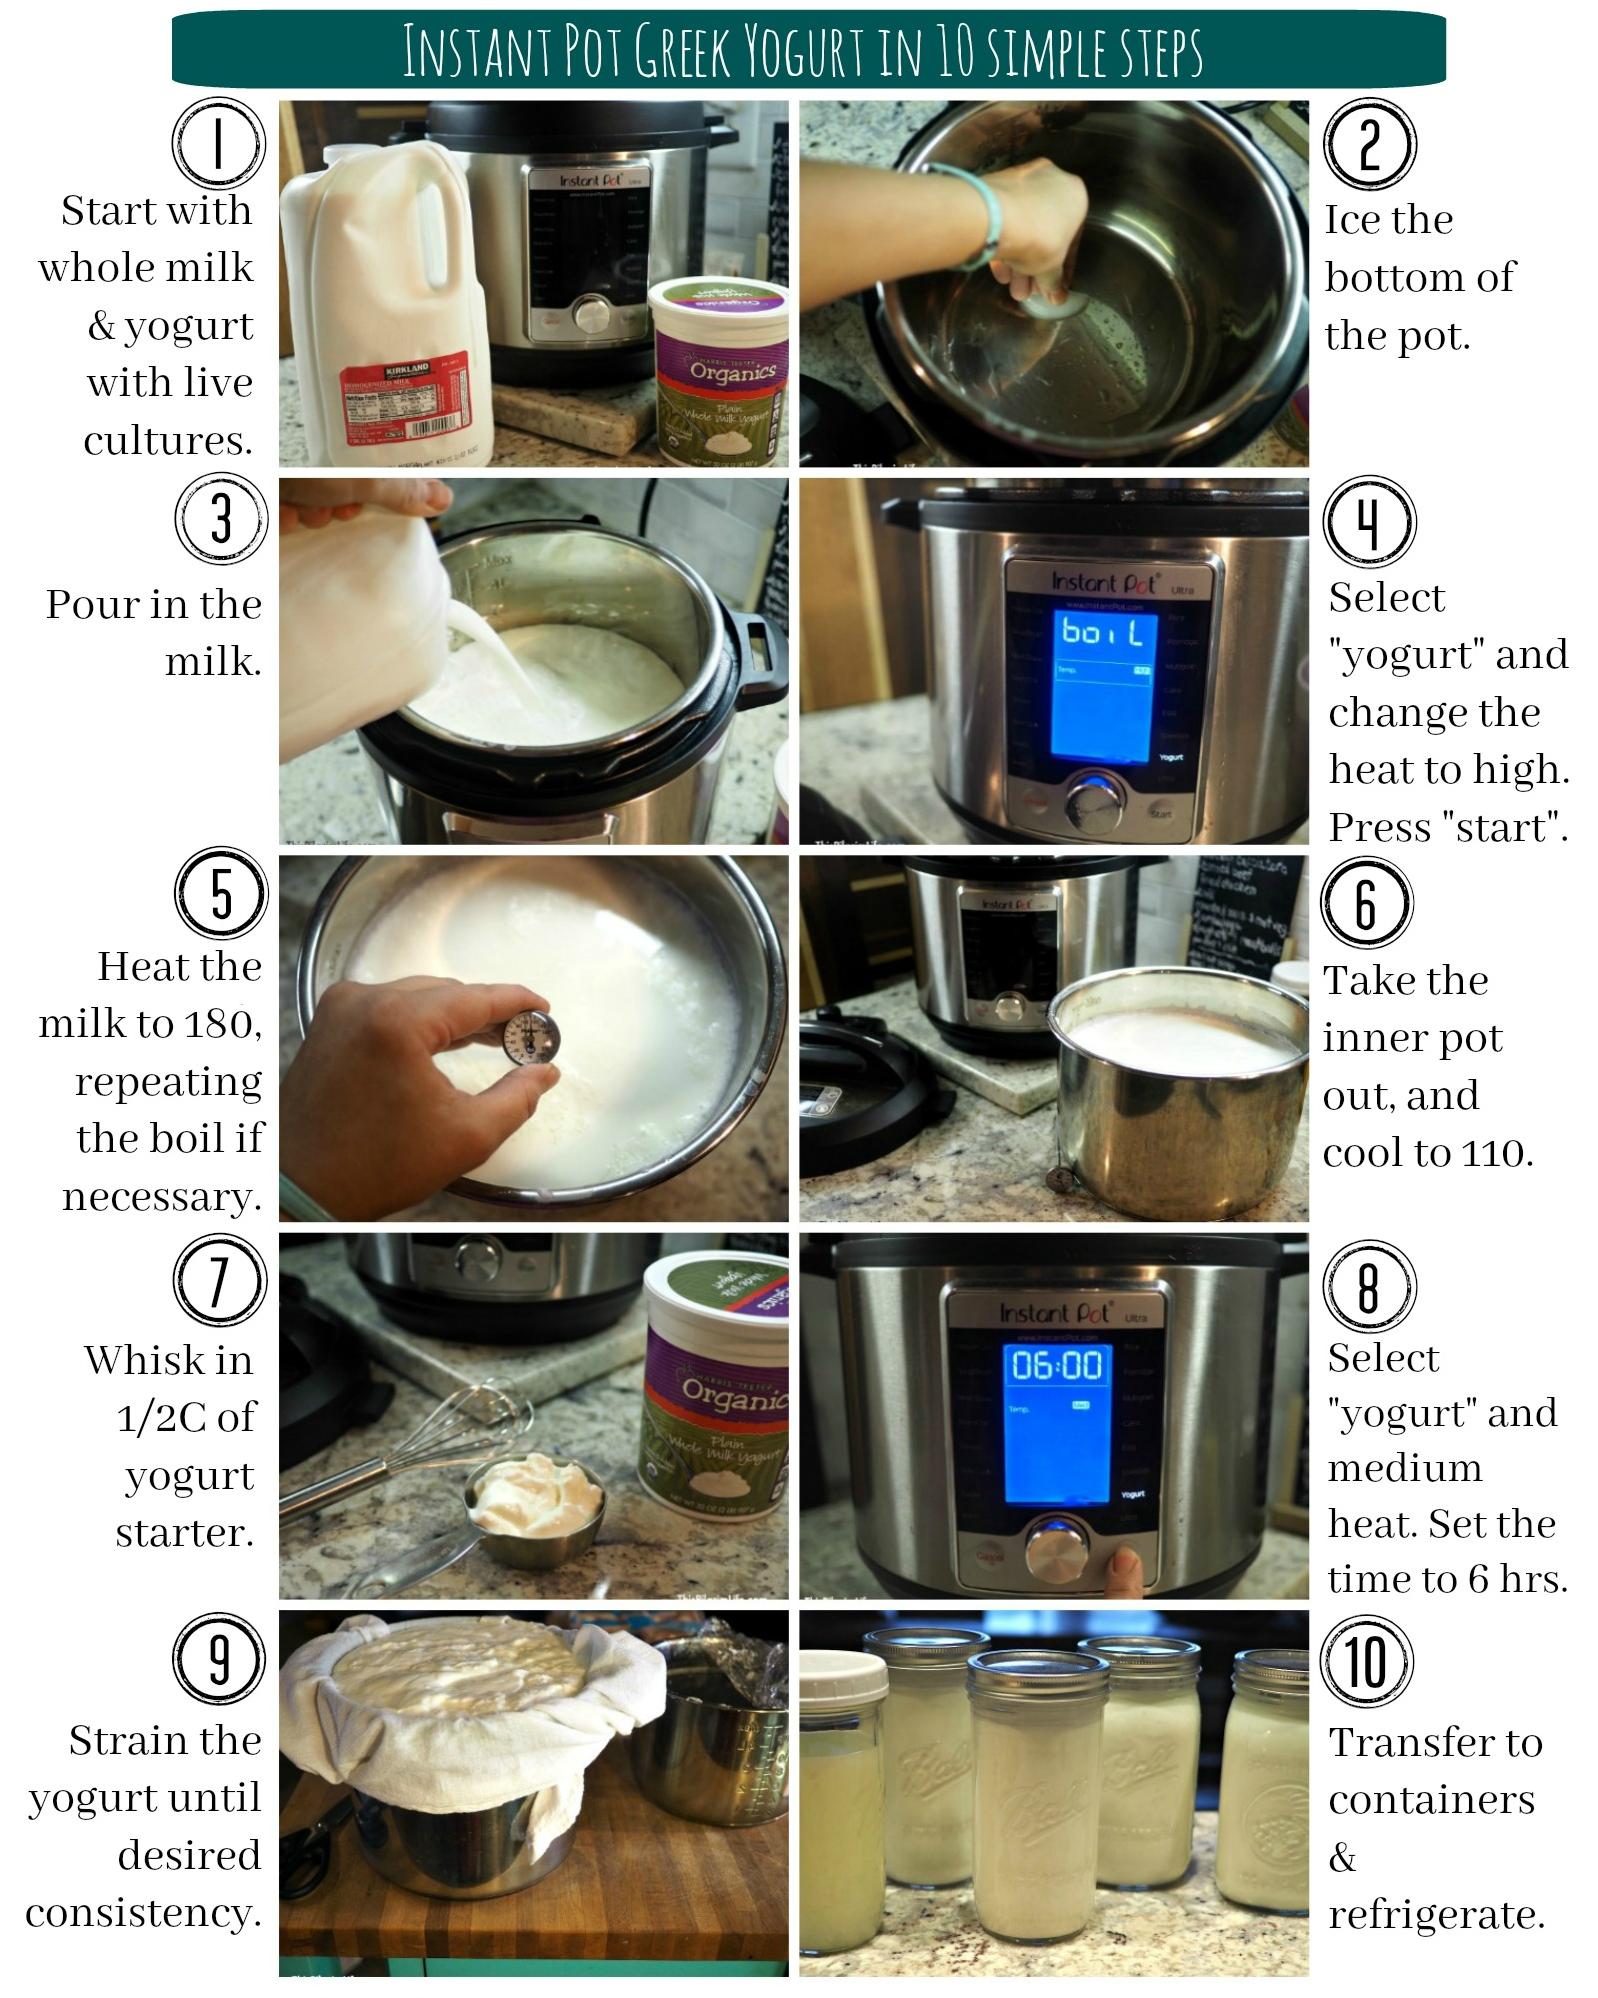
- 1 gallon of milk (whole milk yields best results)
- 2 tablespoons of yogurt starter or plain yogurt with live active cultures
- 1 cup of warm milk (about 110°F)
- Optional ingredients for flavoring: honey, vanilla extract, fresh fruit
Note: Be sure to use good quality milk for making the yogurt. Fairlife milk or lactose-free milk can also be used.
The Recipe How-To

Step-by-Step Instructions for Cold Start Instant Pot Yogurt Recipe
Note: This recipe uses the “cold start” method, so there’s no need to heat the milk prior to making yogurt.
Ingredients:
– 1 gallon of whole milk
– 1 cup of plain yogurt with live and active cultures
– Instant Pot
– Whisk or spoon for stirring
– Food thermometer
– Small bowl
Preparation Time: 20 minutes (active), 12 hours (inactive)
Step 1: Preparing Inner Pot
Clean the inner pot of your Instant Pot, making sure it is free from any residue that may affect the quality or taste of the yogurt.
Step 2: Adding Milk
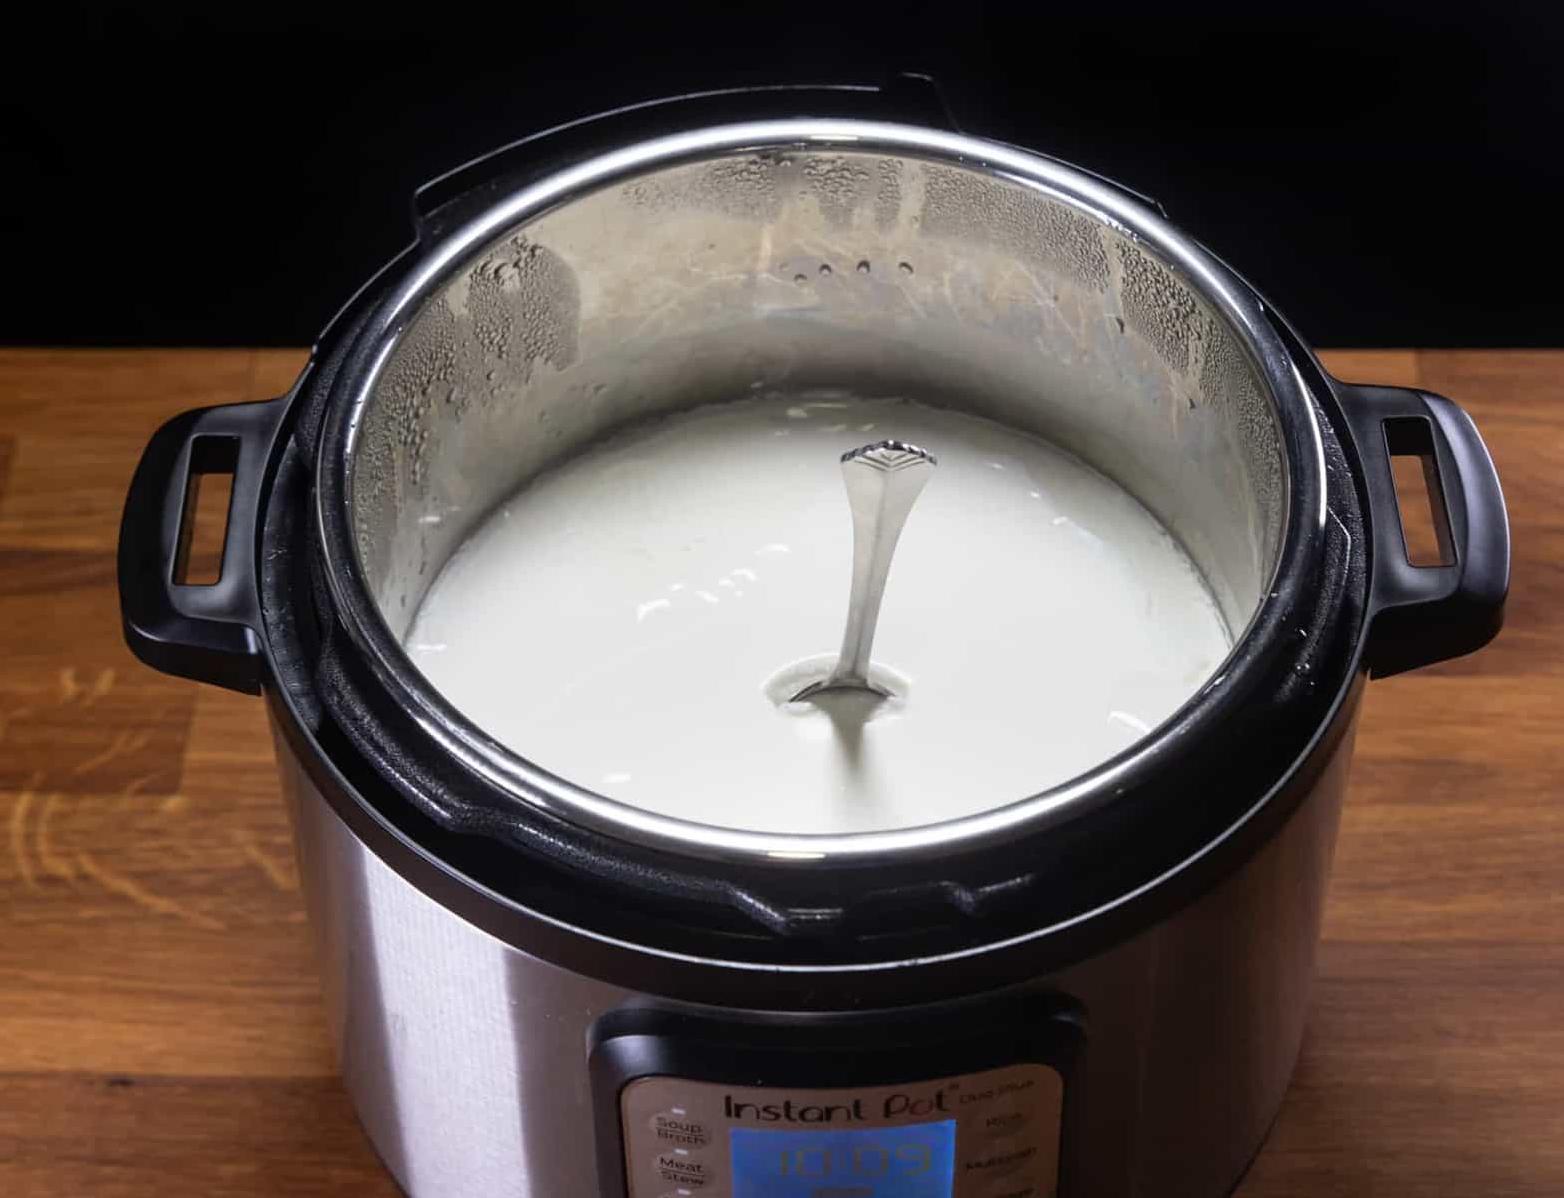
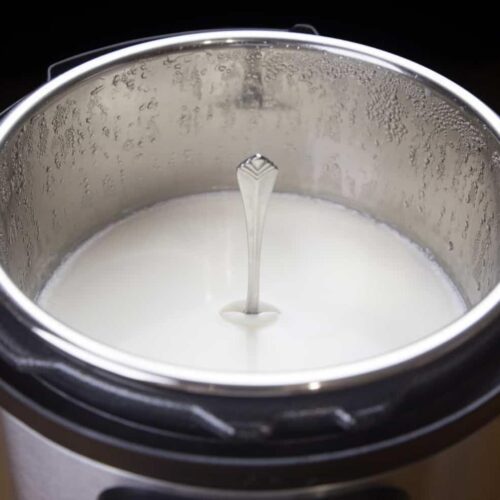
Pour 1 gallon (16 cups) of cold whole milk into the inner pot.
Step 3: Adding Starter Yogurt
Add 1 cup (2 tablespoons per cup) of plain yogurt with live and active cultures, whisk and blend well with cold milk until there are no lumps left.
Step 4: Mixing and Sealing Inner Pot Instant Pot
Mix everything in the inner pot until smooth, then seal the inner pot with its lid.
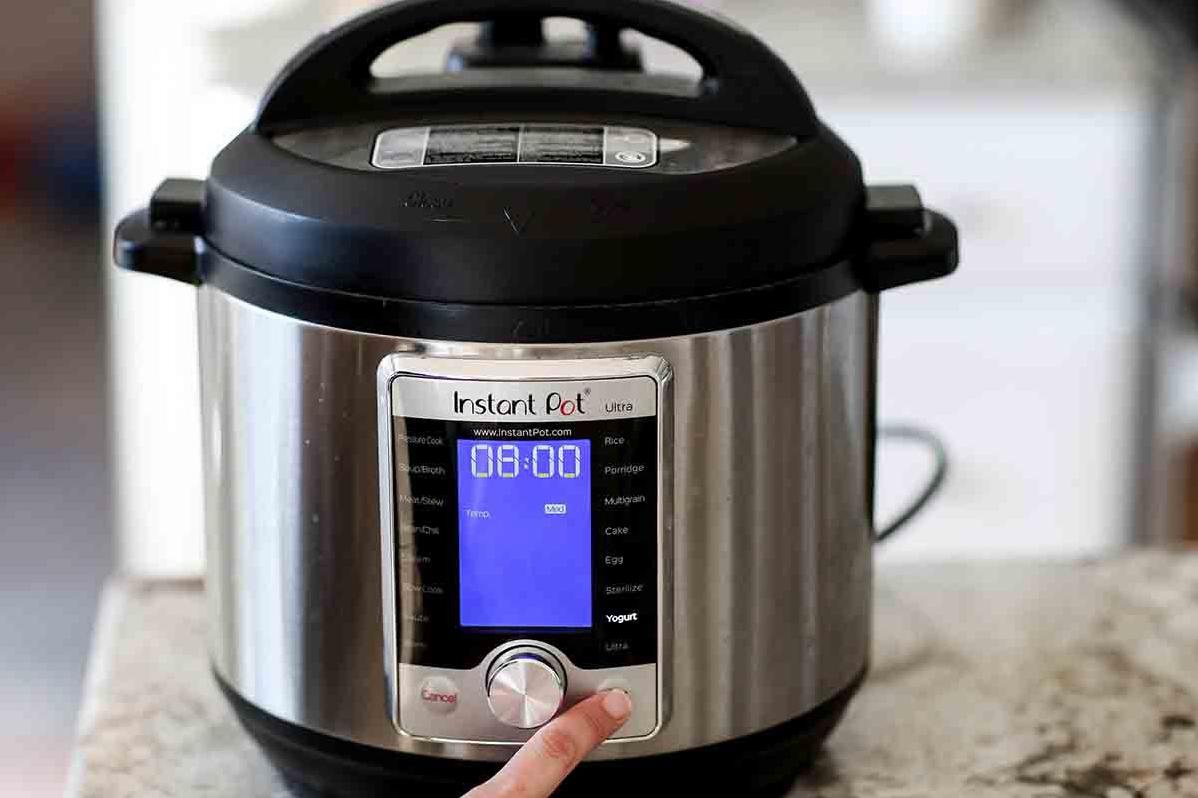
Step 5: Setting Up Instant Pot
Set up in pressure cooker mode; select “Yogurt” setting; adjust the timer to 8 hours. Tip: If you prefer slightly tangy yogurt, adjust the timer to 12 hours but not more than that as doing so might make your yogurt too sour to enjoy.
Step 6: Wait For Instant Pot
Wait for your Instant Pot to do its magic. After few seconds you will see “On” sign, meaning that the pot has started working. Now all you have to do is wait!
Step 7: Check Temperature of Yogurt
After completing 8 hours, check the temperature of the yogurt using a food thermometer. It should be around 180°F with a variance of +/- 3°F.
Step 8: Cooling Instant Pot Yogurt in Refrigerator
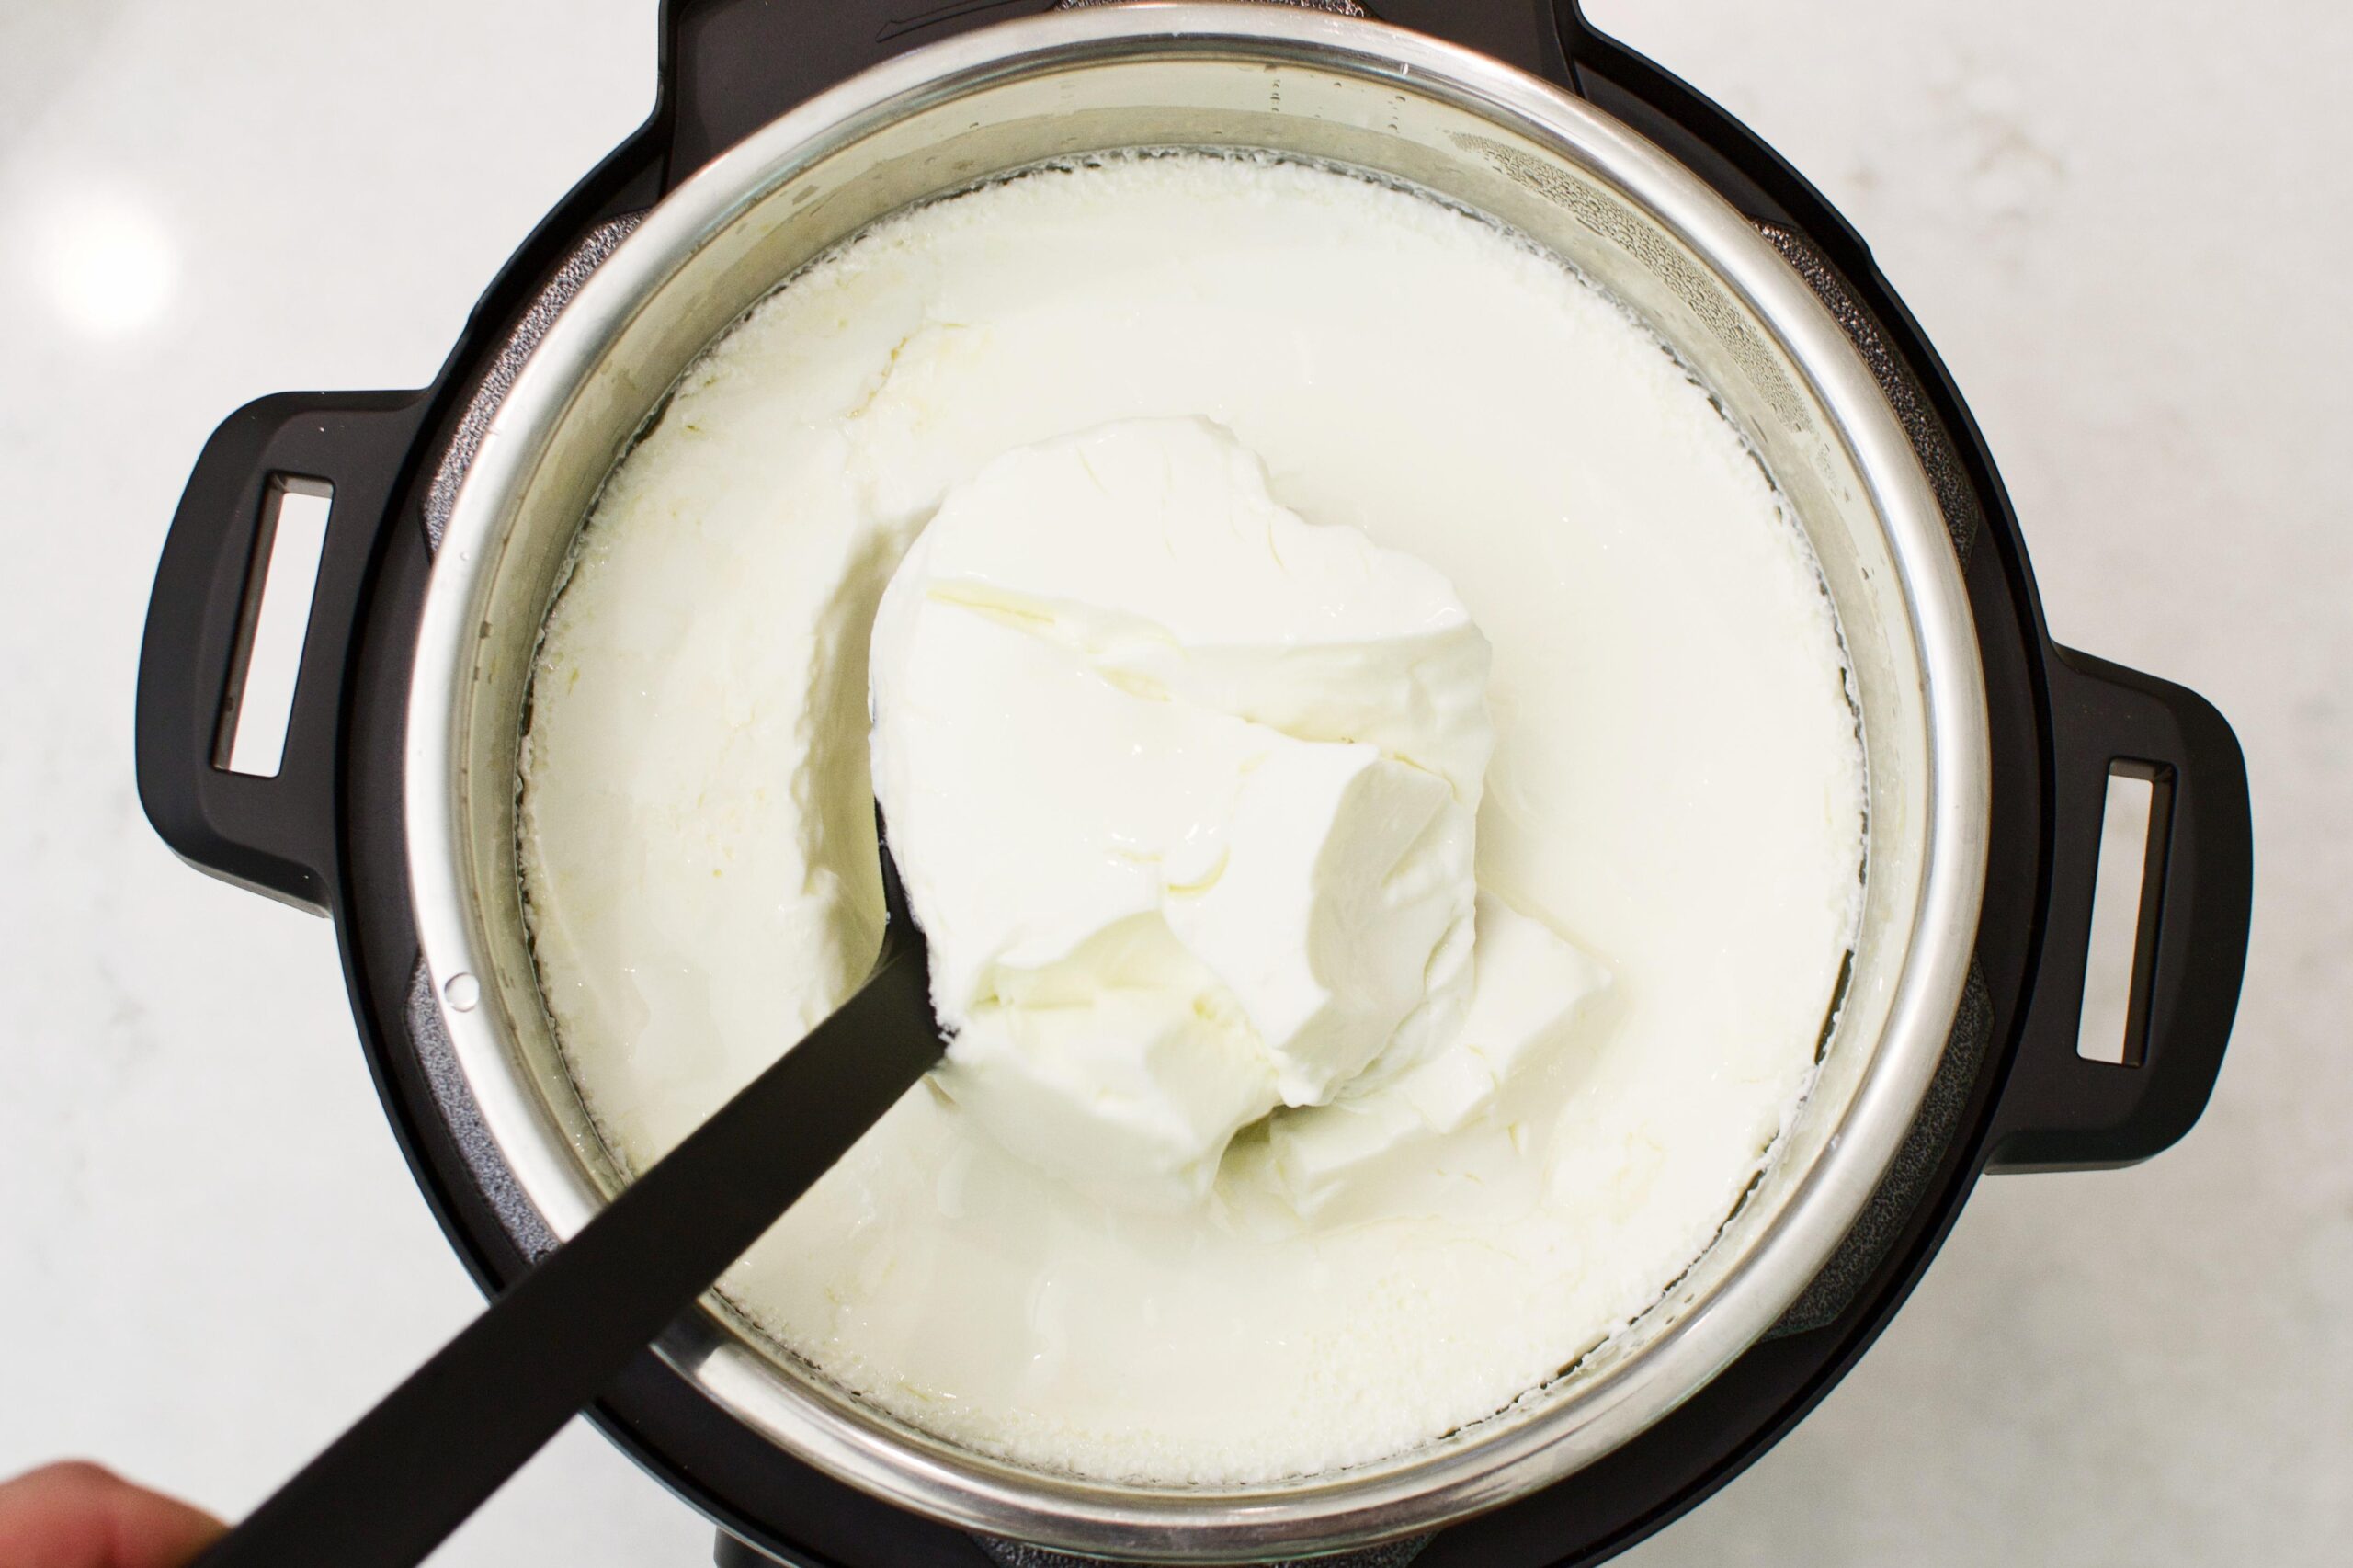
After checking the temperature, turn off Instant Pot and carefully transfer its whole inner pot to the refrigerator. Then, allow the pot to cool down while forming curd for at least 6 hours but preferably overnight (12 hours).
Step 10: Enjoy Your Homemade Yogurt!
Open the lid, and you will find beautifully thickened cold-start yogurt inside your Instant Pot. Scoop it out and enjoy! You may now add any preferred flavorings such as fresh fruits or honey!
Substitutions and Variations
If you’re looking for something different or just want to experiment with flavors, there are plenty of substitutions and variations you can make to your Instant Pot yogurt recipe. Here are a few ideas to get you started:
1. Lactose-free yogurt: If you’re lactose intolerant or simply prefer lactose-free options, opt for a lactose-free milk such as Fairlife milk. The process will be the same.
2. Different types of milk: Remember that you can use different types of milk like soy, almond, cashew, or coconut milk as well. Just make sure they are unsweetened.
3. Greek yogurt: To create a Greek-style yogurt, strain 4 cups of the cold-start yogurt through a cheesecloth or coffee filter placed over a mesh strainer, set over a bowl overnight in the fridge.
4. Flavored yogurt: After you’ve made your plain yogurt, add in your favorite fruits like strawberries, blueberries or mangoes along with some honey and vanilla extract if you like.
5. Sweetened Yogurt: You can add any sweeteners of your choice to the warm milk before adding the starter agent to make a canned fruit-flavored yogurt.
6. Sous vide cooking: Set sous Vide cooker to 115 degrees and follow steps two through five above but let sit in the sous vide bubble bath for fifteen hours (15 hours) instead of eight (8).
7. Slow Cooker Alternative: If you don’t have an Instant Pot, you can still make yogurt using this method in a slow-cooker; heat milk 180°F and cool until temperature reaches about 120°F but no lower than 110°F then stir in two tablespoons (2 tablespoons) of plain yogurt and turn off slow -cooker; cover with towel then lid and leave undisturbed flat on counter for 8 hours (increasing by an hour if cooler room) before straining surfeit liquid from the curd.
These variations and substitutions will give you some flexibility to experiment and create a customized yogurt taste tailored to your liking. Don’t be afraid to try them out and experiment with new flavors!
Serving and Pairing
After making a delicious pot of freshly homemade yogurt, you might be wondering how to best enjoy it. One classic way to savor yogurt is with a little bit of granola and fresh fruit for breakfast or as a snack. You can add a drizzle of honey or maple syrup on top to make it sweeter, or simply enjoy it as is for a refreshing treat.
If you prefer savory snacks, try topping your yogurt with some chopped herbs, olives, and diced vegetables for a light appetizer. You can dip any kind of cracker into the mixture or use it as a condiment on sandwiches and wraps.
Yogurt also makes an excellent ingredient in smoothies and shakes; its creamy texture is perfect for blending with frozen fruits, nut butters or seeds, protein powders, and other nutritious ingredients. For a tropical twist, blend some frozen mango chunks with yogurt – trust me; it’s amazing.
Another popular pairing is using yogurt as a substitute for sour cream in dishes like tacos, burritos, and baked potatoes. Yogurt provides the same tangy taste without the saturated fat content that’s present in sour cream.
Lastly, if you’re looking to add an extra tang to your Indian or Middle Eastern dishes like Tandoori chicken or shawarma, mixing in some yogurt sauce will provide that cool contrast flavor. Simply mix some yogurt with lemon juice, garlic powder, salt, pepper and some fresh herbs like cilantro or mint for an easy and flavorful sauce.
The possibilities are endless in terms of serving and pairing your homemade Instant Pot Greek Yogurt. Experiment often and don’t be afraid to try new recipes; you might just discover your next favorite dish!
Make-Ahead, Storing and Reheating
After making a batch of this instant pot yogurt, you may wonder how you can store and reheat it for future use. Don’t worry, there are several ways to keep your yogurt fresh and delicious.
To make ahead, pour the prepared yogurt into an airtight container and refrigerate for up to a week. Before serving, stir it well to achieve the desired consistency.
For storing, place the yogurt in an airtight container and refrigerate. Use it within seven days of preparation for best quality. Yogurt has probiotics that facilitate lactose fermentation process; hence one should consume the yogurt before the expiration date.
To reheat this yogurt, scoop out the amount that you need and warm it on low heat in a saucepan until the desired temperature is reached. Avoid overheating as it can cause curdling or separation of whey from milk protein leading to spoilage of yogurt.
Also, this instant pot yogurt can be stored in the freezer. Pour it into smaller containers or ice cube trays and freeze for up to six months. Thaw it overnight in the refrigerator before consuming.
One thing to remember when reheating or freezing your yogurt is not to disturb its texture by stirring excessively. This is particularly important if you’re making Greek Yogurt because extra stirring can separate liquids and solids resulting in reduced thickness.
Now that you know how to make-ahead, store, and reheat your instant pot yogurt with ease, you can enjoy this delicious and wholesome treat anytime!
Tips for Perfect Results
When it comes to making yogurt in the Instant Pot, there are a few tips and tricks that can really make a difference in achieving perfect results. With these tips in mind, you can ensure your yogurt turns out delicious every time.
First and foremost, it’s important to use good quality milk. Whether you prefer whole milk or lactose-free, the quality of the milk will greatly impact the flavor and texture of your yogurt. I recommend using Fairlife milk or any other brand that is ultra-pasteurized and free from artificial additives.
Next, make sure to cool down the milk to the correct temperature before adding in the starter. Heating the milk too high or not cooling it enough can lead to failed batches of yogurt. Aim for a temperature of around 110°F when adding in your starter.
Another key tip for perfect Instant Pot yogurt is to use a timer when incubating. The length of time needed for incubation can vary depending on factors such as altitude and humidity. A general rule of thumb is 8 hours for thin yogurt or up to 24 hours for thicker, Greek-style yogurt. Set a timer on your phone or Instant Pot to ensure you are not leaving your yogurt to incubate for too long or not long enough.
For those who prefer a thicker, Greek-style yogurt, using a bag or cheesecloth to strain excess whey can greatly impact texture. Simply place your cooked yogurt in a cheesecloth-lined colander over a bowl and let it strain for several hours until the desired consistency is achieved.
Lastly, don’t be afraid to experiment with different variations and substitutions in your Instant Pot yogurt recipe. Adding fruit, honey or nuts can add extra flavor and nutrition while switching up the type of milk or starter can change the overall character of the yogurt.
By following these tips and playing around with different ingredients and incubation times, you’ll soon become an expert at making delicious and healthy Instant Pot yogurt.
FAQ
Before we conclude this yogurt-making journey, here are some frequently asked questions with concise and practical answers that you might find helpful. Keep on reading to get valuable insights into potential issues and troubleshooting.
Is it worth it to make yogurt in an Instant Pot?
Creating homemade yogurt in the Instant Pot is a surprisingly simple task that not only saves you money, but also results in a richer and tastier yogurt compared to store bought options. I now eagerly anticipate this weekly routine of mine.
How long does Instant Pot yogurt last?
Making yogurt in the Instant Pot yields a creamy and delicious product that can last up to two weeks when stored properly in the refrigerator. It is also a good idea to set aside some of the yogurt as a starter the next time you make a batch. This way, you won’t have to purchase a new starter yogurt every time you want to make this tasty treat.
How much yogurt starter for 1 gallon milk?
If you’re planning on making yogurt at home, it’s important to know how much milk and starter you’ll need depending on the quantity of yogurt you want to produce. For a quart of milk, add 1-2 teaspoons of starter; for half a gallon of milk, add 1 generous tablespoon; and for a full gallon of milk, add 2 tablespoons to ¼ cup of starter. These measurements will help ensure that your yogurt turns out just right.
Should I Instant Pot yogurt for 8 or 24 hours?
To achieve different textures and flavor profiles in yogurt, fermentation time plays a crucial role. A shorter ferment time, around 8 hours, yields a less tangy and thinner yogurt. However, a longer fermentation period, approximately 24 hours, creates a thicker, tangier, and more probiotic-rich yogurt. It’s crucial to note that fermenting beyond 24 hours results in diminishing returns and starts to kill off some probiotics, as more aggressive bacteria overpower the milder ones.
Bottom Line
:
In conclusion, this Instant Pot Yogurt recipe is one that you definitely need to try. With its simple steps and easy-to-find ingredients, it’s a great way to make homemade yogurt that is both delicious and healthy. Not only does it save you money, but it also ensures that you know exactly what is going into your yogurt.
The Instant Pot has definitely proven itself to be a versatile kitchen appliance, and this yogurt recipe is just another reason why you should invest in one. It’s not just about convenience, but the quality of food that you can make with it.
I hope this recipe has inspired you to step out of your comfort zone and try something new in the kitchen. Give it a try and let me know how it turns out!
Instant Pot Yogurt Recipe
Ingredients
- 7 cups milk
- 1 tablespoon yogurt
Instructions
- Pour in all the milk.
- Place lid on Instant Pot and close the Pressure Valve.
- Push the Yogurt button and then the Adjust button, until it says "boil.".
- When Beep is heard, open lid and remove cooking pot. Allow it to cool to 100 - 115 degrees, stirring occasionally.
- When temperature is reached, remove a cup of the milk and add yogurt to the cup and whisk in well. Add that cup back into the cooking pot and whisk in thoroughly.
- Place cooking pot into the Instant Pot and replace lid.
- Press the Yogurt button and the display screen will say 8:00 (hit again or Adjust, if necessary). Adjust time to 6 hours.
- When the beep is heard, remove the cooking pot and strain the yogurt. Place in the fridge to chill.
Add Your Own Notes
Nutrition
Recommended Recipes Just For You
None found